Overclocking a computer's processor or memory causes it to go faster than its factory rated speed. A processor rated at 2.4GHz might be overclocked to 2.5GHz or 2.6GHz, while memory rated at 200MHz might be pushed to 220MHz or higher. The extra speed results in more work being done by the processor and/or memory in a given time period, increasing the overall computing performance of the PC.
For older processors, heat is also a factor worth keeping a close eye on. Modern processors have thermal sensors which will slow down or shut off the PC, but older CPUs do not necessarily feature these safety devices. The best know example of this is the AMD AthlonXP (socket A/462), which was famous for burning itself up in less than 5 seconds if the heatsink was not installed properly (or at all).
Computer එකක් ගත්තම සම්මත තත්වයන් යටතේ ක්රියාත්මක වෙන වේගයක් තියනවා. සමහර වේලාවන්ට ඒ නිශ්චිත වේගය අඩාල වෙනවා. අධික උණුසුම වගේ දෙයක් නිසා පරිගණකයේ වේගය අඩාල වෙන්න පුලුවන්. පරිගණකයක වේගය රදා පවතින්නේ පවතින එක සාධකයක් තමයි පරිගණකයේ තාවකාලික මතකය. තවත් සාධකයක් තමයි පරිගණකයේ processor වේගය. ඉතින් Overclocking කිරීමකදී වෙන්නේ බොහෝවිට පරිගනකයේ BIOS වැඩසටහන හරහා මේවා යාවත්කාලීන කිරීමයි.
Overclocking the processor and system memory can significantly boost game performance, benchmark scores and even simple desktop tasks. Since almost every modern processor and memory module is overclockable to at least a slight degree, there are few reasons not to attempt it.
අඩු වේගයක් සහිත Computer එකකින් වැඩි වේගයක් ලබා ගැනීමට Overclock කරන්න පුලුවන්. Overclocking වලදී වෙනස්කිරීම් කරන්නේ පරිගණකයේ processor එකට.මවුපුවරුවේ යම් යම් තාක්ශණික වෙනස්කම් වලට. Computer Hardware දැනුමක් නැත්නම් මෙය කිරීමෙන් වලකින්න
Hardware හදුනාගැනීම
Hardware කොටස් පිලිබදව හොද අවබෝදයක් තියෙන්නෙ ඕනේ.පරිගණකයේ මවුපුවරුව අදාල පොතේ ඇති මවුපුවරුව Overclocking වලට සහය දක්වනවද නැද්ද කියන විස්තරයන්.සාමනයෙන් Processors නිශ්පාදිත තත්වයෙන්ම අඩු වේගයන්ගෙන් වැඩ කරන්නයි නිර්මාණය කරන්නේ. ඒ කියන්නෙ අපිට ලැබෙන GHz වේගයට වඩා වැඩි වේගයක් මේ Processor තුල පවතිනවා. RAM සහය දැක්වුවට මවුපුවරුව සහය නොදක්වනවා නම් අපි Overclocking කිරීමෙන් වලකින්න ඕනේ.
Processor එක දැනට පවතින ක්රියාකාරීත්වය
Processor එකට අයත් කොටස් වලින් පලමු කොටස Heat Sink එක. ඊලගට Heat Sink එක හා Processor අතරට යොදන ගම් එක. ඊලගට Fan එක. ඒ එක්කම Processor එක. Overclocking කිරීමේදී මේ Processor සම්මත් වේගයටත් වඩා වැඩි වේගයක් බලාපොරොත්තු වෙනවා. ඒකේ අවසාන ප්රතිඵලය Processor වෙනදාටත් වඩා අධික ලෙස රත් වීම.සාමාන්යයෙන් පරිගණකයක ක්රියාකාරී උශ්ණත්වය 30-65 අතර පවතිනවා.සාමාන්යයෙන් බාවිතා වෙන හීට් සින්ක් එකක් මේ උණුසුම දරා ගැනීමට ප්රමාණවත් උනත් Overclocking වලින් පසු පිට වෙන උණුසුම් දරාගන්න ප්රමාණවත් නෑ. ඒ නිසා අපිට new Heat Sink එකකට යන්න වෙනවා
Preparing for Overclocking
In order to get the best out of current hardware, the most recent drivers and BIOS version for the motherboard need to be acquired. System benchmarks should be run pre-overclocking to establish a performance 'baseline'.
Readers should visit their motherboard manufacturer's website to obtain the most recent set of drivers for their motherboard, as well as the most recent BIOS version. For instructions on finding the current BIOS version and overwriting it with a newer edition, see PCstats' Guide on the subject. Newer BIOS versions may add overclocking options and stability, so this is always a good first step.
Overclocking කිරීමට පෙර
පරිගණකයේ BIOS වෙත යොමු වෙන්න.මේ BIOS වැඩසටහන තුලදී දක්නට
ලැබෙනවා CPU Ratio කියන කොටස. ඊට පසුව තියන සැකසුම් වෙනස් කිරීමයි
අපි කරන්නේ.වර්තමානයේ සාමාන්යයෙන් Processor වල Speed 1.6GHz සිට 3.0GHz දක්වා ප්රමාණ වලින් පවතිනවා.මේ speed කියන්නේ මවුපුවරුව හා මවුපුවරුවට සම්බන්ද RAM මෙන්ම වෙනත් කාඩ් සමග වැඩකල හැකි ඝටිකා වේගයයි .අපි
ඒකට කියනව system-clock speed එක කියලා.අපේ පරිගණකයේ Processor Core 2 Duo සමග 1066MHz BUS speed සහිතයි නම් Processor clock speed එක වෙන්නේ 266MHz
ප්රමාණයක්.

දැන් Overclocking කිරීම පටන් ගමු. BIOS වල ඇති
Advanced Chipset Features" හෝ "Chipset Configuration" කියන එකට යන්න.
එක් එක් Motherboard වල එක එක නම් බාවිත කරනවා. ඊලගට අපිට දකින්න ලැබෙයි
FSB Frequency කියන එක.මෙතනදී පුලුවන් Processor Clock Speed වැඩි
කරගන්න. ඒ වෙනස් කම රදාපවතින්නේ Motherboard සහය දක්වන ප්රමාණයටයි.තියන clock speed වගේ 5% වැඩි කිරීම තමයි සම්මත ක්රමය.සම්මත මට්ටමේදී 2GHz වේගයක් ලබා දුන්න සකසනයේ clock speed 200MHz. මේ අගය
225MHz දක්වා වැඩි කරපුවාම processor speed 2.25GHz දක්වා වැඩිවෙනවා.
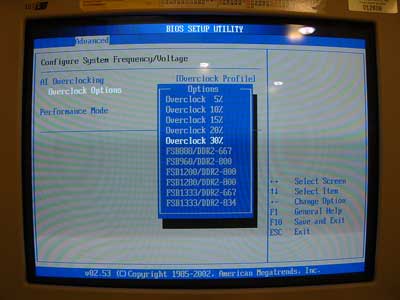
As seen in the screenshots below, this page will contain the FSB adjustment controls and voltage adjustment controls.
Increasing the FSB or 'CPU host frequency' or (Motherboard Clock or FSB or a host of other terms for the same thing) will increase the FSB speed of the motherboard, overclocking the processor and memory at the same time.
Increasing the voltage to the CPU core, memory or chipset will feed more power to those components to aid in stability while increasing heat.
This page may also contain memory divider options depending on the motherboard.
Everything needed to overclock the system should be on this one BIOS page.


පරිගණකයේ BIOS වෙත යොමු වෙන්න.මේ BIOS වැඩසටහන තුලදී දක්නට ලැබෙනවා CPU Ratio කියන කොටස. ඊට පසුව තියන සැකසුම් වෙනස් කිරීමයි අපි කරන්නේ.වර්තමානයේ සාමාන්යයෙන් Processor වල Speed 1.6GHz සිට 3.0GHz දක්වා ප්රමාණ වලින් පවතිනවා.මේ speed කියන්නේ මවුපුවරුව හා මවුපුවරුවට සම්බන්ද RAM මෙන්ම වෙනත් කාඩ් සමග වැඩකල හැකි ඝටිකා වේගයයි .අපි ඒකට කියනව system-clock speed එක කියලා.අපේ පරිගණකයේ Processor Core 2 Duo සමග 1066MHz BUS speed සහිතයි නම් Processor clock speed එක වෙන්නේ 266MHz ප්රමාණයක්.

දැන් Overclocking කිරීම පටන් ගමු. BIOS වල ඇති Advanced Chipset Features" හෝ "Chipset Configuration" කියන එකට යන්න. එක් එක් Motherboard වල එක එක නම් බාවිත කරනවා. ඊලගට අපිට දකින්න ලැබෙයි FSB Frequency කියන එක.මෙතනදී පුලුවන් Processor Clock Speed වැඩි කරගන්න. ඒ වෙනස් කම රදාපවතින්නේ Motherboard සහය දක්වන ප්රමාණයටයි.තියන clock speed වගේ 5% වැඩි කිරීම තමයි සම්මත ක්රමය.සම්මත මට්ටමේදී 2GHz වේගයක් ලබා දුන්න සකසනයේ clock speed 200MHz. මේ අගය 225MHz දක්වා වැඩි කරපුවාම processor speed 2.25GHz දක්වා වැඩිවෙනවා.
As seen in the screenshots below, this page will contain the FSB adjustment controls and voltage adjustment controls.
Increasing the FSB or 'CPU host frequency' or (Motherboard Clock or FSB or a host of other terms for the same thing) will increase the FSB speed of the motherboard, overclocking the processor and memory at the same time.
Increasing the voltage to the CPU core, memory or chipset will feed more power to those components to aid in stability while increasing heat.
This page may also contain memory divider options depending on the motherboard.
Everything needed to overclock the system should be on this one BIOS page.
Different motherboard's BIOS screens will look different and use different names for the various menus and options, but the options themselves should be grouped together in one menu as seen above. If the memory timings options are not visible, try hitting CTRL+ALT+F1 when entering the BIOS.
The second BIOS page that should be identified now is the 'PC health status' page, or similar.

- Boot the computer into the BIOS screen.
- Increase FSB speed in 5-10MHz increments. Reboot after each increment to ensure that the system can still boot into Windows properly.
- If the system hangs, crashes or refuses to boot into Windows, increase the memory voltage slightly and retry. If this does not work, increase the chipset voltage and finally the core voltage. If this still does not work, reduce FSB settings slightly, reset the voltages to their previous values and try again.
- Keep going until the system can no longer boot reliably into Windows, then back off to the previous 'safe' settings. Keep an eye on the processor's temperature in the BIOS. Remember that it should be under 70°C.
- Benchmark the overclocked system and compare the results to the performance baseline established earlier. If the system does not complete the benchmarks or crashes, either reduce the FSB setting slightly or increase voltages to compensate and retry.
- After the operation Restart the computer
RAM Overclocking කිරීම
මෙතනදී RAM එකේ Processing මේ speed වෙනස් කිරීමක් වෙනවා.
දැනට බාවිත කරන speed එක පෙන්නුම් කරන අතරම අපිට බාවිත කලහැකි උපරිම speed එක ලබාදෙන්නත් පුලුවන්.DDR3 1333MHz Processing speed සහිත RAM එකක් 1450MHz සකසන වේගයක් බවට පත්කරන්න පුලුවන්.

මේ සැකසුම් අවසානයේදී computer restart කරන්න.සමහර motherboard, උදාහරණයක්
විදියට ASUS වගේ motherboard අපි මේ කල සැකසුම් වල දෝෂ පවතිනවා නම් ඒ සැකසුම්
බාර නොගෙන default තත්වයෙන් පරිගණකය ක්රියාත්මක කරනවා. එහෙමත් පරිගණකය
ක්රියාත්මක වෙන්නේ නැත්නම් CMOS battery ගලවලා CMOS memory clear කිරීමෙන්
යලිත් පුරුදු පරිදි computer ක්රියාත්මක කරගන්න පුලුවන්.ඉතින් කොහොමද?මේක ප්රයෝජනවත් උනානම් comment එකක් එහෙම දාල Like කරලා යන්න අමතක කරන්නත් එපා!!!!!!!
Different motherboard's BIOS screens will look different and use different names for the various menus and options, but the options themselves should be grouped together in one menu as seen above. If the memory timings options are not visible, try hitting CTRL+ALT+F1 when entering the BIOS.
The second BIOS page that should be identified now is the 'PC health status' page, or similar.
- Boot the computer into the BIOS screen.
- Increase FSB speed in 5-10MHz increments. Reboot after each increment to ensure that the system can still boot into Windows properly.
- If the system hangs, crashes or refuses to boot into Windows, increase the memory voltage slightly and retry. If this does not work, increase the chipset voltage and finally the core voltage. If this still does not work, reduce FSB settings slightly, reset the voltages to their previous values and try again.
- Keep going until the system can no longer boot reliably into Windows, then back off to the previous 'safe' settings. Keep an eye on the processor's temperature in the BIOS. Remember that it should be under 70°C.
- Benchmark the overclocked system and compare the results to the performance baseline established earlier. If the system does not complete the benchmarks or crashes, either reduce the FSB setting slightly or increase voltages to compensate and retry.
- After the operation Restart the computer
RAM Overclocking කිරීම
මෙතනදී RAM එකේ Processing මේ speed වෙනස් කිරීමක් වෙනවා. දැනට බාවිත කරන speed එක පෙන්නුම් කරන අතරම අපිට බාවිත කලහැකි උපරිම speed එක ලබාදෙන්නත් පුලුවන්.DDR3 1333MHz Processing speed සහිත RAM එකක් 1450MHz සකසන වේගයක් බවට පත්කරන්න පුලුවන්.